On this page you can find written Kaltura instructions.
If you cannot find what you are looking for, please contact us on streamingmedia-icts@uva.nl.
KALTURA
What is Kaltura?
Where can I find Kaltura?
MANAGE MEDIA
How do I manage my media?
Select My Media in the top navigation bar on video.uva.nl or find My Media in the Canvas menu.
Once in My Media, you have several options to manage your media:
- Search > Using the search function, you can search not only the title and description of your media but also the metadata (tags, chapters, slides, captions, etc.). You can also use the search function in together with sorting and filtering.
- Folder > Organize your video's in folders.
- Sort & Filter > In the left pane you can filter and sort your videos with a variety of filters.
- Create > Under the 'create' button you will find different ways to add new media to your library. You can upload a new video, record a new video, create a quiz or an interactive video, stitch different media together, link a YouTube video or create a channel or playlist.
- Actions > With the three dots menu you can edit or publish your media or see the analytics. When multiple media is selected, you can do your actions in bulk.
- Publication status Private > Newly uploaded or recorded material is set to Private by default, which means that only people with specific access right to this video can see it in their My Media section.
- Publication status Unlisted > Media with the Unlisted status can be viewed by anyone with the link to this media.
- Publication status Published > Once the media has been uploaded to a course or a channel, its status will show as 'Published'. As long as the media is published, it cannot be removed from your My Media collection.
How do I grant other people rights to view, publish or edit my media?
There are three options to collaborate with other people on your media:
| Co-editor | Co-publisher | Co-viewer |
Co-editors can't delete media or add new collaborators. |
Being assigned as a co-publisher doesn't grant additional publishing entitlements. Users can only publish to locations they already have permission to use.
|
|
- Go to My Media.
- Select one or more videos.
- Go to More actions > Add/Remove collaborators.
- Choose Add collaborators.
- Find the person you'd like to add as a collaborator.
- Choose if they should become a co-viewer, co-publish and/or a co-editor.
- Click Add and your collaborators are added.
Another way to add collaborators and to see who is already assigned as a collaborator to you media:
- Click on the media.
- Under the media, select the three dots
- Click Edit.
- Go to Roles & permissions
- At Roles & permissions, you'll find an overview of all collaborators.
- To add collaborators, click +Add users > Collaborators.
How do I transfer a video to someone else?
To make someone else owner of your media, use the instructions below.
- Go to My Media.
- Select one or more media you would like to transfer to someone else.
- Click on More Actions.
- Click on Transfer Ownership
- Find the user you want to transfer the media to.
If you cannot find a user, they didn't login to video.uva.nl or My Media in Canvas yet. Kaltura therefore does not recognize them as a user. After they have logged in, you will be able to find the user. - If you want to be assigned as a collaborator, select Make myself a collaborator.
- Click Transfer ownership and the media will be transferred to the new owner.
Back to top
How do I download my video?
- Go to the media you want to download.
- Click on the three dots under the media and select Edit.
- Go to the tab Assets.
- Enable the End-User Download Permissions switch.
- Go back to the media page of your media.
- Click on the three dots under your media and select Download > Original.
Back to top
How do I delete my video?
- Go to the media you want to delete.
- Click on the three dots under the media and select Delete.
- Your media will be moved to the recycle bin and will be automatically deleted after 30 days.
You can recover your media from the recycle bin or permanently delete them manually:
- Navigate to your profile on the right top corner and select My Recycle Bin.
- Delete the whole recycle bin in one go or manually recover or delete media per media:
How do I replace my video for another one?
- Go to the entry you want to replace.
- Select the tree dots under the media and go to Edit.
- Go to the Asset tab and upload your new file under Replace media.
How do I read the analytics of my video?
If you are the owner or co-editor of media, you are able to see analytics of this specific entry.
- Navigate to My Media.
- Click on the three dots next to your entry and choose Analytics.
A page with analytics will load, and will give you the following information:
DASHBOARD OVERVIEW
- Date filter - By default, you will see the analytics for the past 30 days. You can adjust this to any time range you wish.
- Player impressions - A player impression event is counted each time the player is loaded on the page.
- Plays - A play is counted when a user clicks the Play button to watch a video.
- Unique Viewers - Number of unique users that had an active viewing action during the time period. Note that Player Impressions are not counted as a viewing action.
- Minutes Viewed - Total number of playback minutes played by the viewers, based on quartile milestones.
- Avg. Completion Rate - Average percentage of completion across all plays. Example: If a user once watched 20% of the video and the second time watched 80% of the video, the calculation will be (20+80)/2 plays = 50% Avg. Completion Rate.
VIEWS
In this section, you can see the number of views over the duration of the video, understand which sections of the video generated interest, and at which point you lost your audience.
VIDEO PERFORMANCE OVER TIME
To explore performance trends over time, use the graph (shown below) to review key metrics:
- Player Impressions - A player impression event is counted each time the player is loaded on the page.
- Plays - A play is counted when a user clicks the Play button to watch a video.
- Unique Viewers - Number of Unique Users that had an active viewing action during the time period. Note that Player Impressions are not counted as a viewing action.
- Minutes Viewed - Total number of playback minutes played by the viewers based on quartile milestones.
- Avg. Completion Rate - Average percentage of completion across all plays. Example: If a user once watched 20% of the video and the second time watched 80% of the video, the calculation will be (20+80)/2 plays = 50% Avg. Completion Rate.
You can view the data for each metric in daily or monthly granularity. Hover over any point in the graph to see the detailed data.
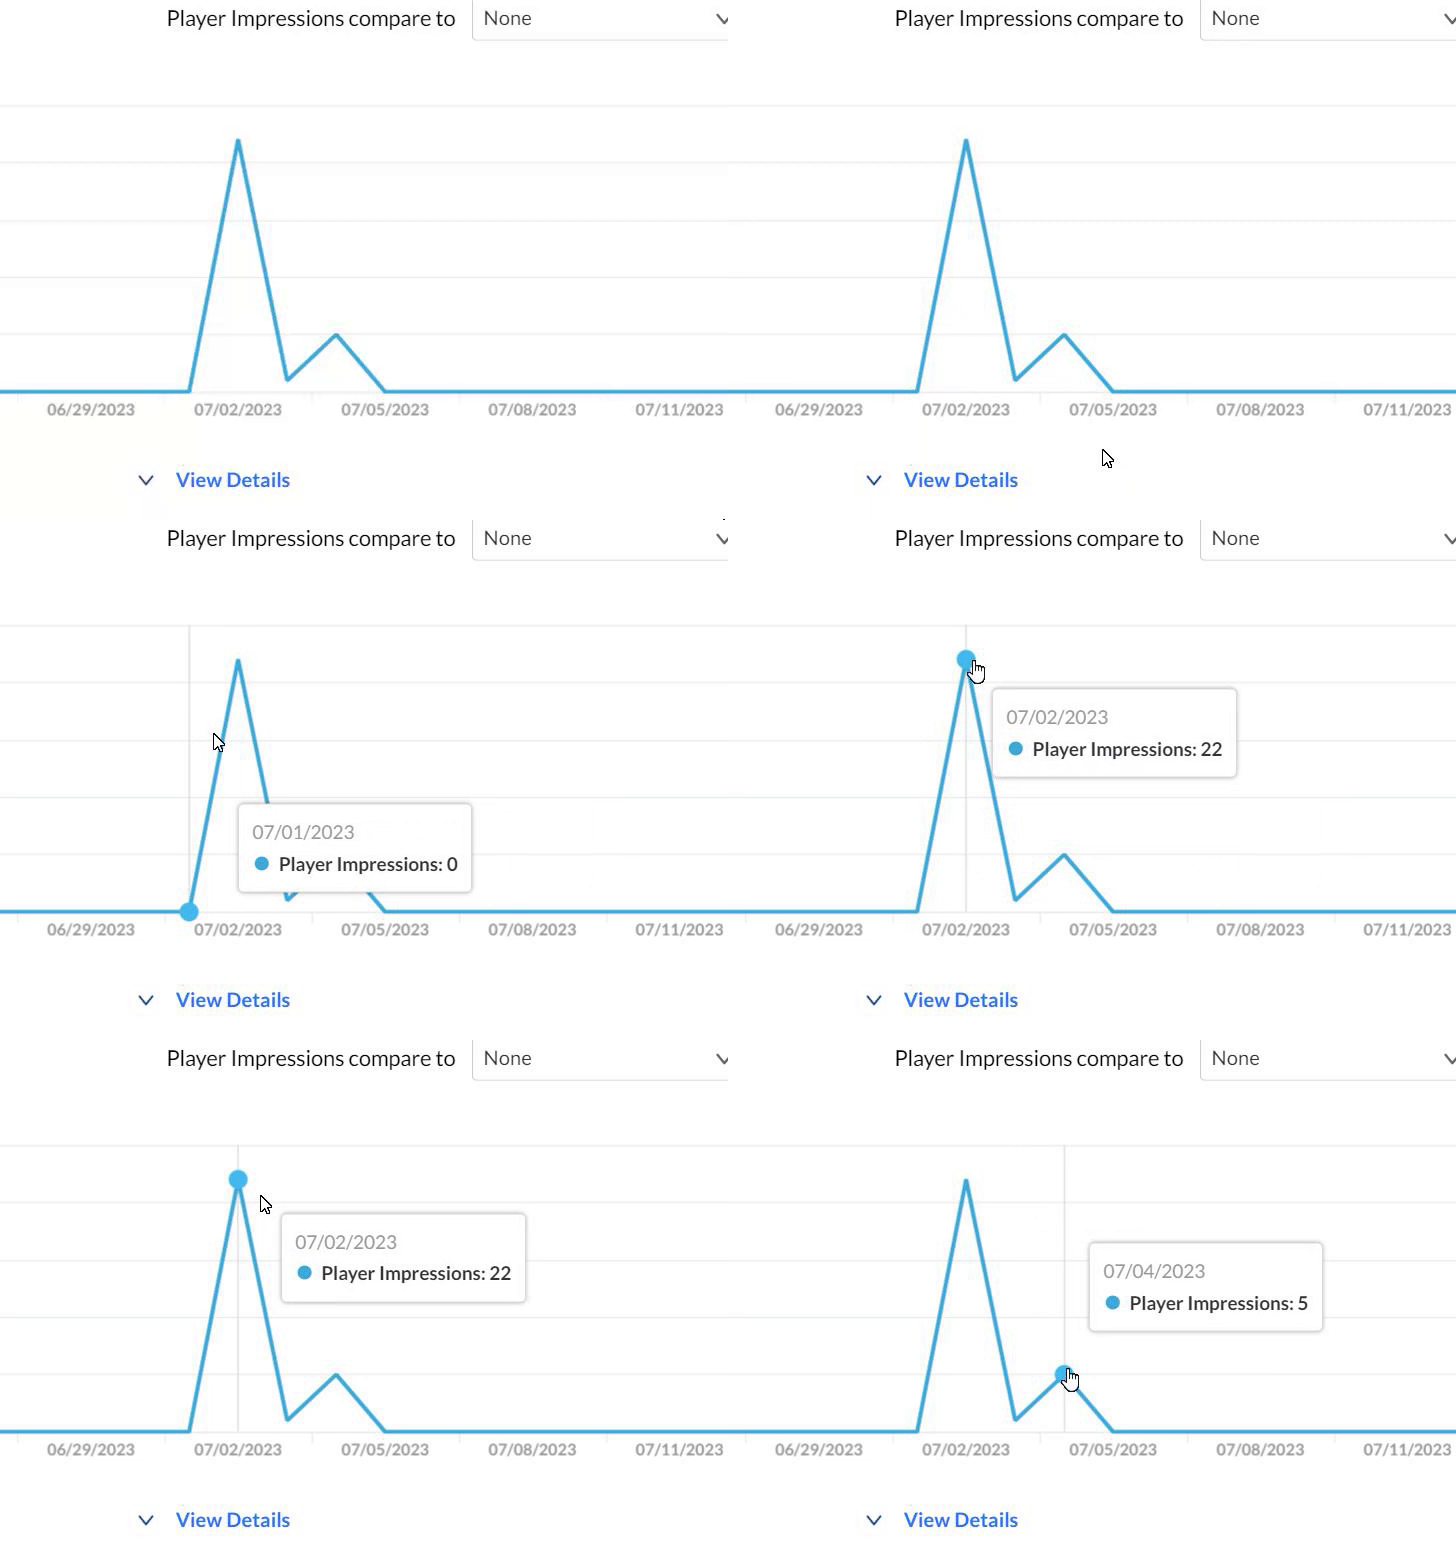
You can also compare to another metric by selecting another metric from the drop down list.
To change the time period or filter the data, use the date picker and filter panel at the top of the dashboard. You can also compare data from different time periods.
VIDEO PERFORMANCE METRICS
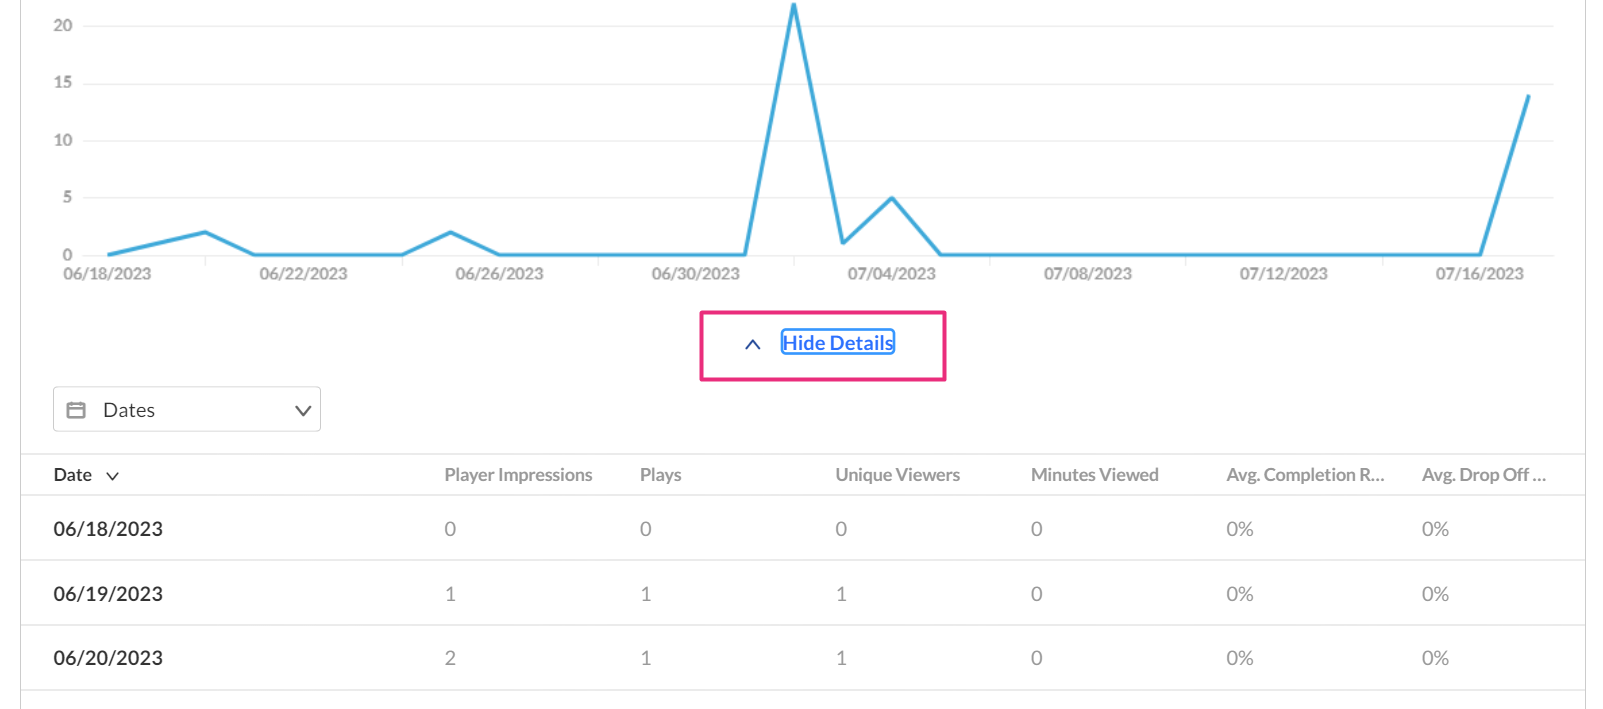
You can click on View Details at the bottom of the graph to expand a table of all the metrics for the time frame.
ENGAGEMENT FUNNEL
The engagement funnel shows the viewer journey, from discovery to viewing the entire video.
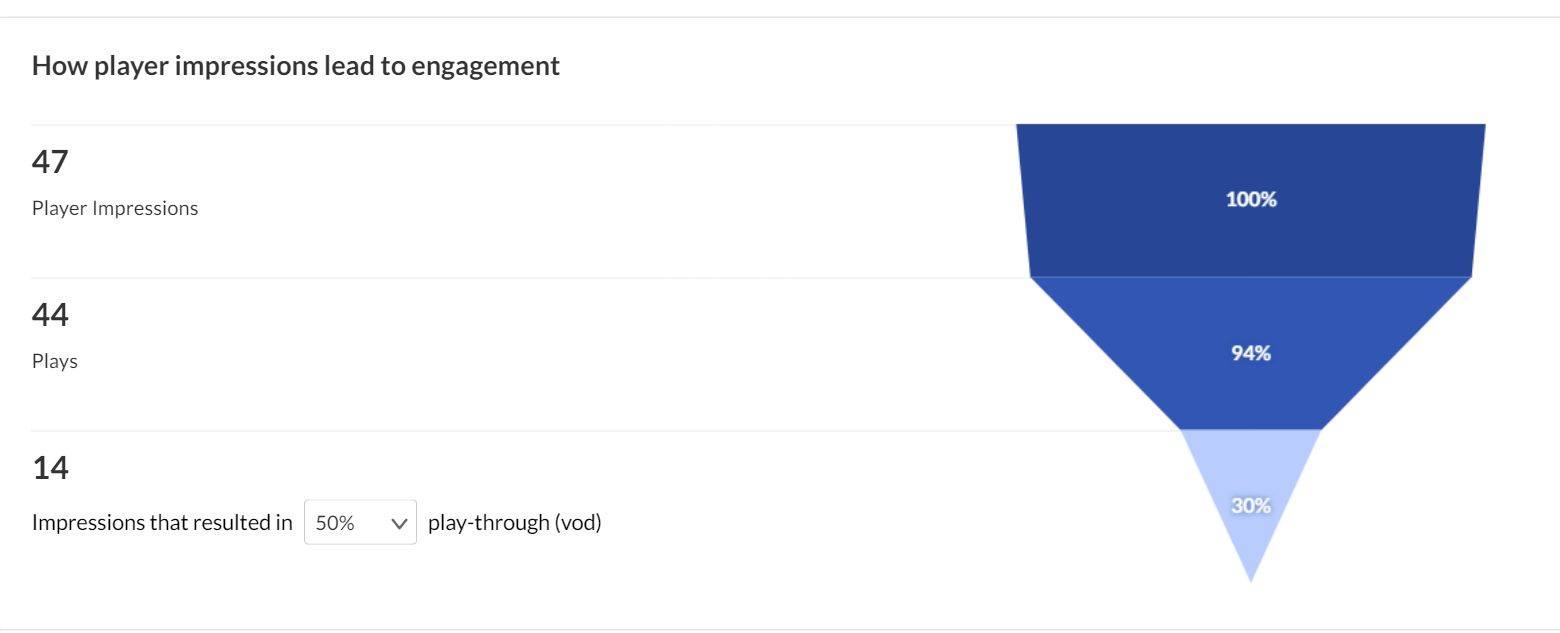
The following metrics are shown in the funnel:
- Player impressions
- Plays
- Plays that reach <x%> percent play through - You can select the percentage yourself.
TOP COUNTRIES
The Top Countries panel ranks the geographical distribution by plays.
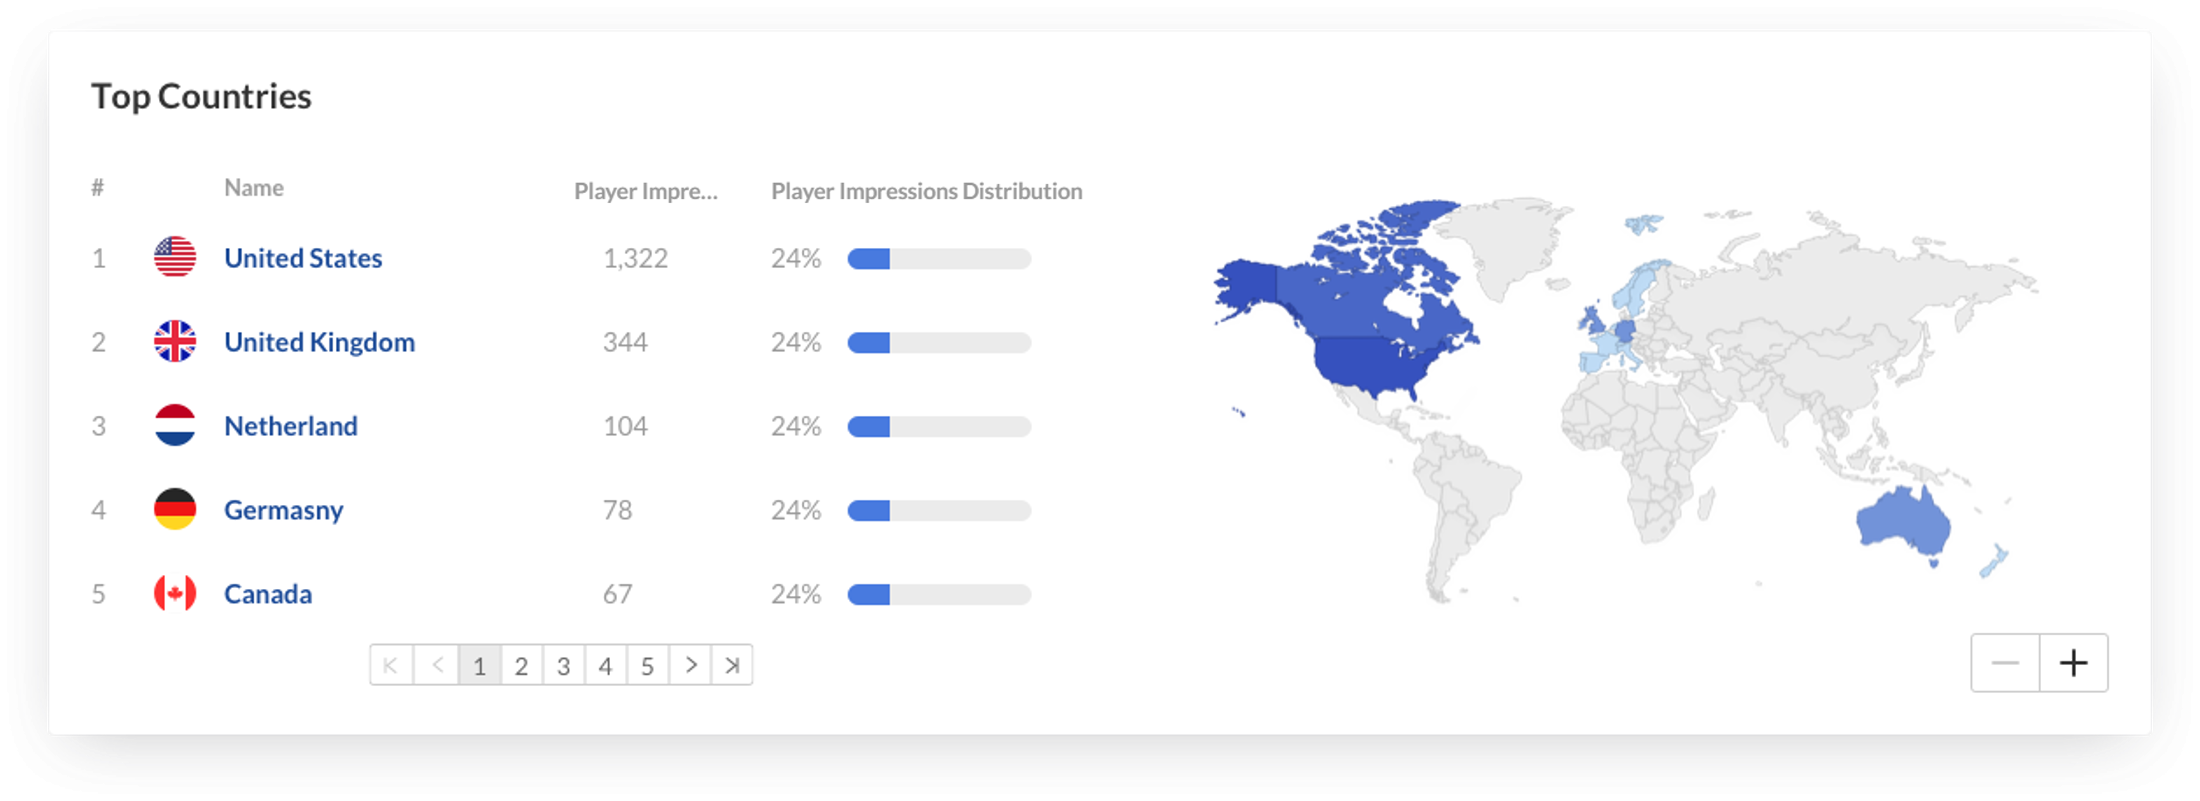
The heatmap shows the countries. The darker the shade of blue, the more plays for that country. The table ranks the countries by plays and also shows plays distribution compared to total number of plays. You can drill down to region by selecting a country on the map or from the table. Select a region to drill down to cities.
DEVICES OVERVIEW
Here you can see the distribution of devices usage by plays, and on which device viewers watched the entry.

TOP DOMAINS
If your video is shown on different platforms, you can see the top domains where your video is watched. The top domains are ranked by domains that had the most number of plays in the selected time frame.
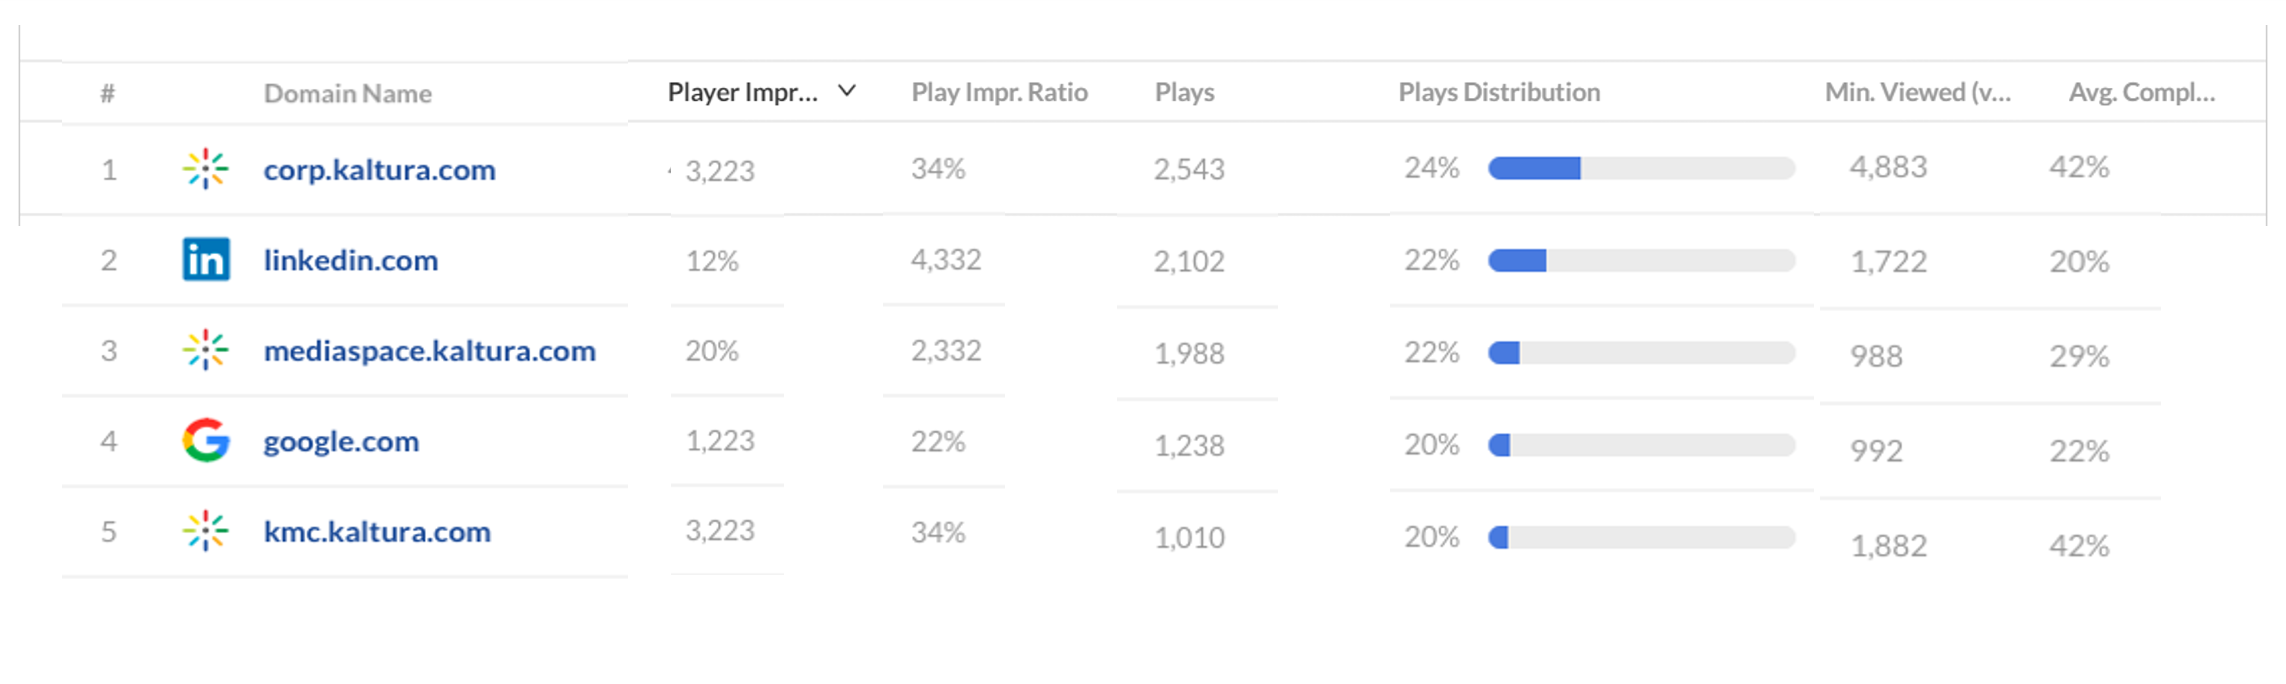
For each domain the following metrics are available:
- Player Impressions - A player impression event is counted each time the player is loaded on the page.
- Player Impression Ratio - Number of plays divided by number of impressions.
- Plays - A play is counted when a user clicks the Play button to watch a video. If the player is set to auto-play, a play event will be counted when the player begins to play the video.
- Plays Distribution - Number of plays divided by the total number of plays in the selected timeframe.
- Minutes Viewed - Total number of playback minutes played by the viewers based on quartile milestones.
- Avg. Completion Rate - Average percentage of completion across all plays. Example: If a user once watched 20% of the video and the second time watched 80% of the video, the calculation will be (20+80)/2 plays = 50% Avg. Completion Rate.
SPECIFIC DOMAINS
You can also drill down to a specific domain to see all the URLs under that domain, and the same metrics in a more granular view. You can view the data for each metric in daily or monthly granularity. Hover over any point in the graph to see the detailed data. Click on the title of the metric in the table to sort the table based on this metric. 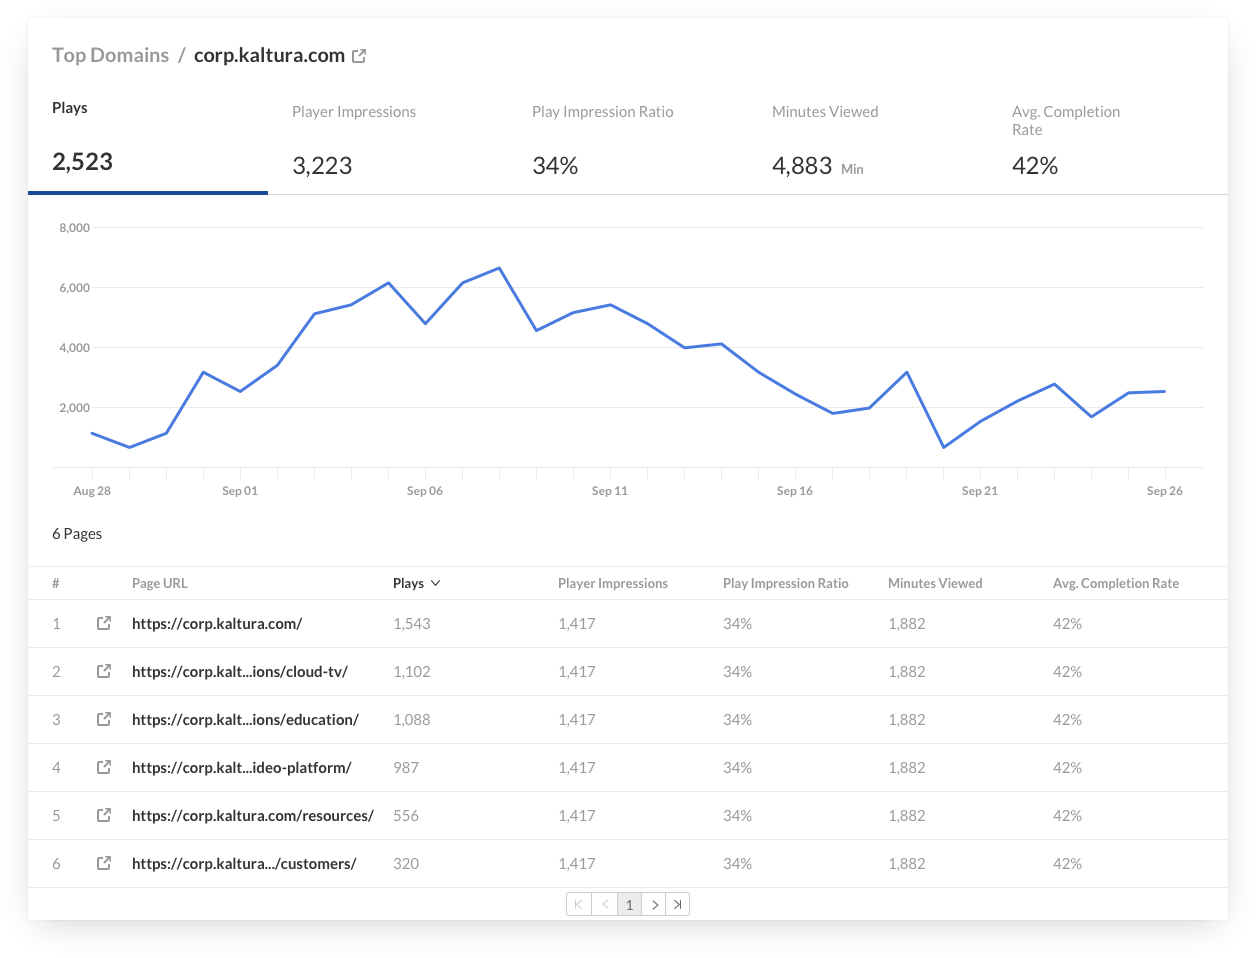
To learn more about Kaltura analytics terms and definitions, go to Kaltura Analytics Terminology.
ADD MEDIA
How do I upload media from my device?
- Click the + Create button on the right side of the screen, and select Upload.
- Select the file you want to upload via Select files or drag and drop your files into the dotted window.
You can also upload multiple files at the same time. - While your files are uploading, you can edit the metadata of your video or publish video by clicking on Private, or Edit to edit your metadata.
- It might take a while before your whole media is uploaded. If it is a video, the uploading time might take 2 or 3 times the duration of the video.
How do I upload a 360 video?
- Upload your video as usual and navigate to your media.
- Under the media go to the three dots and click Edit.
- Add the tag 360 to your media and Save. After this, the video will be shown as a 360 video.
RECORD MEDIA
How do I install Kaltura Capture?
If you have an UvA-managed device, go to the Software Center on your device and download Kaltura Capture from here.
After the installation is completed, you can launch Kaltura Capture as described in How do I record a video with Kaltura Capture?
If you do not have an UvA-managed device, follow the instructions below.
- Click the + Create button on the right side of the screen, and select Capture.
- On the screen that loads, select either Download for Windows or Download for Mac, depending on your device.
- Double click on the downloaded file and follow the steps in the installation wizard.
- After all the steps are completed, you can launch Kaltura Capture as described in How do I record a video with Kaltura Capture?
How do I record a video with Kaltura Capture?
Before you want to use Kaltura Capture, you have to install the software on your device. See How do I install Kaltura Capture for instructions.
- Click +Create on video.uva.nl or in My Media in Canvas.
- Choose Capture and the Kaltura Capture app will launch.
- After the app has launched, you have several options to make a recording:
-
- Screen selection. If you have multiple screens, you can select the different screens at (4). You can also disable screen recording by clicking on the monitor icon.
- Camera/screen selection. You can select a specific camera at (4). At (2) you can also choose to record an extra screen instead of a camera. Disable recording camera by clicking on the camera icon.
- Microphone selection
- Dropdown menu for selecting different screens, camera or microphones.
- Record full screen.
- Record only a selected area.
- Record button.
- Manage your media and advanced settings.
-
- Select the red button to start your recording.
- A countdown of 3 seconds will start, after which the recording will start;
- Stop recording.
You can also use the shortcut ⌘/Ctrl + Shift + S. - Pauze/resume recording.
You can also use the shortcut ⌘/Ctrl + Shift + R. - Minimize button. If the recording bar is in your recorded screen, you can minimize the Capture recording bar to have a clean recording.
- Extra tools to make annotations. You can;
- Draw on the recorded screen.
- Draw errors.
- Create a textbox (max. 500 characters).
- Select an area on the screen or select an annotation you created to move it on the screen.
- Show a whiteboard
- Clear all annotations.
- Stop recording.
- After finishing your recording a new screen will appear.
- Choose a name for your recording and optional a description and/or tags.
- Click Save & Upload. Your file will be uploaded to your My Media on video.uva.nl and in Canvas.
It might take a while before your media is uploaded. Usually it takes 2 to 3 times the length of the video.
How do I find my video, recorded in Kaltura Capture?
After your video is recorded and uploaded you can find your file in My Media on video.uva.nl and in Canvas. If you want to find the original .mp4 on your device, follow the instructions below.
- Click on +Create on video.uva.nl or in My Media in Canvas.
- Choose Capture and the Kaltura Capture app will launch.
- After Kaltura Capture is launched, click Manage.
- Click on the Settings icon and copy the path written behind Current recording directory.
- Copy this path into your Explorer (Windows) or Finder (Mac) and press Enter. All your recorded videos will be shown here.
KALTURA IN CANVAS
Where to find my media within Canvas?
There are several ways of approaching Kaltura media within Canvas:
My Media in the main navigation bar
For an overview of all your media, and media which you are a collaborator of, go to My Media in the main navigation bar on the left side of the screen.
Media Gallery within a course
A lecturer can activate the media gallery of a course. If the media gallery is made visible within a specific course, all the media within this course will show.
Submit video assignments
For submitting video assignments, see [For students] How do I submit a video in Canvas assignments?
Embed media on a Canvas page
For embedding media on Canvas pages, see [For lecturers] How do I embed a video on a Canvas page?
Embed media in Canvas modules
For embedding media on Canvas pages, see [For lecturers] How do I embed media in a Canvas module?
[For students] How do I submit a video in Canvas assignments?
- Upload your video to Kaltura as described in ADD MEDIA. Make sure you fill in all the mandatory metadata fields.
- Navigate to the Canvas assignment were you would like to submit your video.
- Click Start Assignment.
- Find the plug icon in the text editor en select View all.
- In the popup window that appears, select Submit video.
- A new window will appear. Find the video you would like to submit and select Embed.
If the Embed button is white, this means the mandatory metadata does not have a value. Please go to your media and complete all mandatory metadata. - At the bottom of the page you can submit your assignment by clicking Submit assignment.
[For lecturers] How do I create a video assignment in Canvas?
- Go to your course.
- Open Assignments.
- Click Add (+) Assignment
- Add assignment name and description.
- At Submission Type choose Online followed by Text Entry.
- At other assignment information if wanted.
- Click Save or Save and Publish (if you directly want to publish your assignment and your assignment is created.
[For lecturers] How do I embed a video on a Canvas page?
- Go to your course.
- Open the page were you would like to embed a video.
- In the Rich Content Editor, click on the green Share video button.
If the Share video button does not show, click on the Plug icon> View All to find the share button.
- A new window will appear. Find the video you would like to submit and select Embed.
If the Embed button is white, this means the mandatory metadata does not have a value. Please go to your media and complete all mandatory metadata.
[For lecturers] How do I embed media in a Canvas module?
It is possible to embed Kaltura media as a module item in Canvas.
- Go to your Canvas course.
- Go to Modules.
- Click the + in the module you would like to add media.
- A pop up window will appear. Select External tool (1) in the dropdown menu en click Kaltura Media (2).
- Find the video you would like to submit and select Embed.
If the Embed button is white, this means the mandatory metadata does not have a value. Please go to your media and complete all mandatory metadata. - Click Add item.
[For lecturers] How do I create a video quiz assignment, which is connected to the gradebook?
If you want to create a video quiz assignment, please remind students to complete their quiz in one sitting. If a quiz is left open for several hours or days, the browser session may expire and grades may not sync to the LMS gradebook. Encourage students to avoid long breaks or switching devices while taking the quiz.
- Create a video quiz in your My Media. (See How do I create a video quiz?)
- Go to your course.
- In your course's navigation pane, click the Assignments (1) tab and click + Assignments (2).
For quiz scores to pass to the Canvas Gradebook, the quiz must be launched from the Assignments tab. If launched from the Course Gallery, quiz scores will not transfer to the gradebook.
The Create New Assignment page displays. - Scroll down to Submission Type.
- Select External Tool en click Find.
- Select Kaltura Media.
The Link Resource from External Tool window displays. - Find the desired quiz and click Embed.
If the Embed button is white, this means the mandatory metadata does not have a value. Please go to your media and complete all mandatory metadata.
The Configure External Tool window displays again. - Click Select.
- If you want to assign points, scroll up to the Points section and enter a value. If no points are set, the Canvas gradebook will display a score of 0 after the quiz is submitted. However, you will still be able to view students' responses and scores through Kaltura's analytics for that quiz.
- Scroll down and click Save or Save and publish.
- The quiz displays on the Assignments page.
- When students complete and submit their quiz, the grades are automatically sent to the Canvas Gradebook for the relevant assignment and student.
CREATE VIDEO QUIZZES AND INTERACTIVE VIDEOS
How do I create an interactive video?
An interactive video is a video in which the viewer can make choices, causing the content to adapt to their input. This engages the viewer more actively, can make the learning experience more personalized and effective, and allows you to show different scenarios or outcomes.
To create your interactive video, follow the steps below.
Set up an interactive video
- Select Interactive Video from the +Create menu.
The 'Create Interactive Video' page opens. -
In the Set Details section:
- enter a name (required)
- enter a description (optional).
- at the confidential field, select NO (required, confidential videos can not be shared)
- select a language (required)
- select your faculty in the department field (required)
Select media for your interactive video
- Click on the Add Media arrow to open the My Media section. The My Media section displays the media available for use in your video.
- Click Add to the right of the media you want to add to your video.
- When your media list is ready, click Create.
The video composer opens. -
Click Show Media at the far right to view the videos you selected.
Your selected media will show. - To select or deselect more media, scroll down and select Add/Remove From Library.
Build your interactive video structure
- To build your interactive video, you can click and drag nodes onto the node map (the large canvas area in the center).
Empty nodes act as placeholders that you can assign videos to later.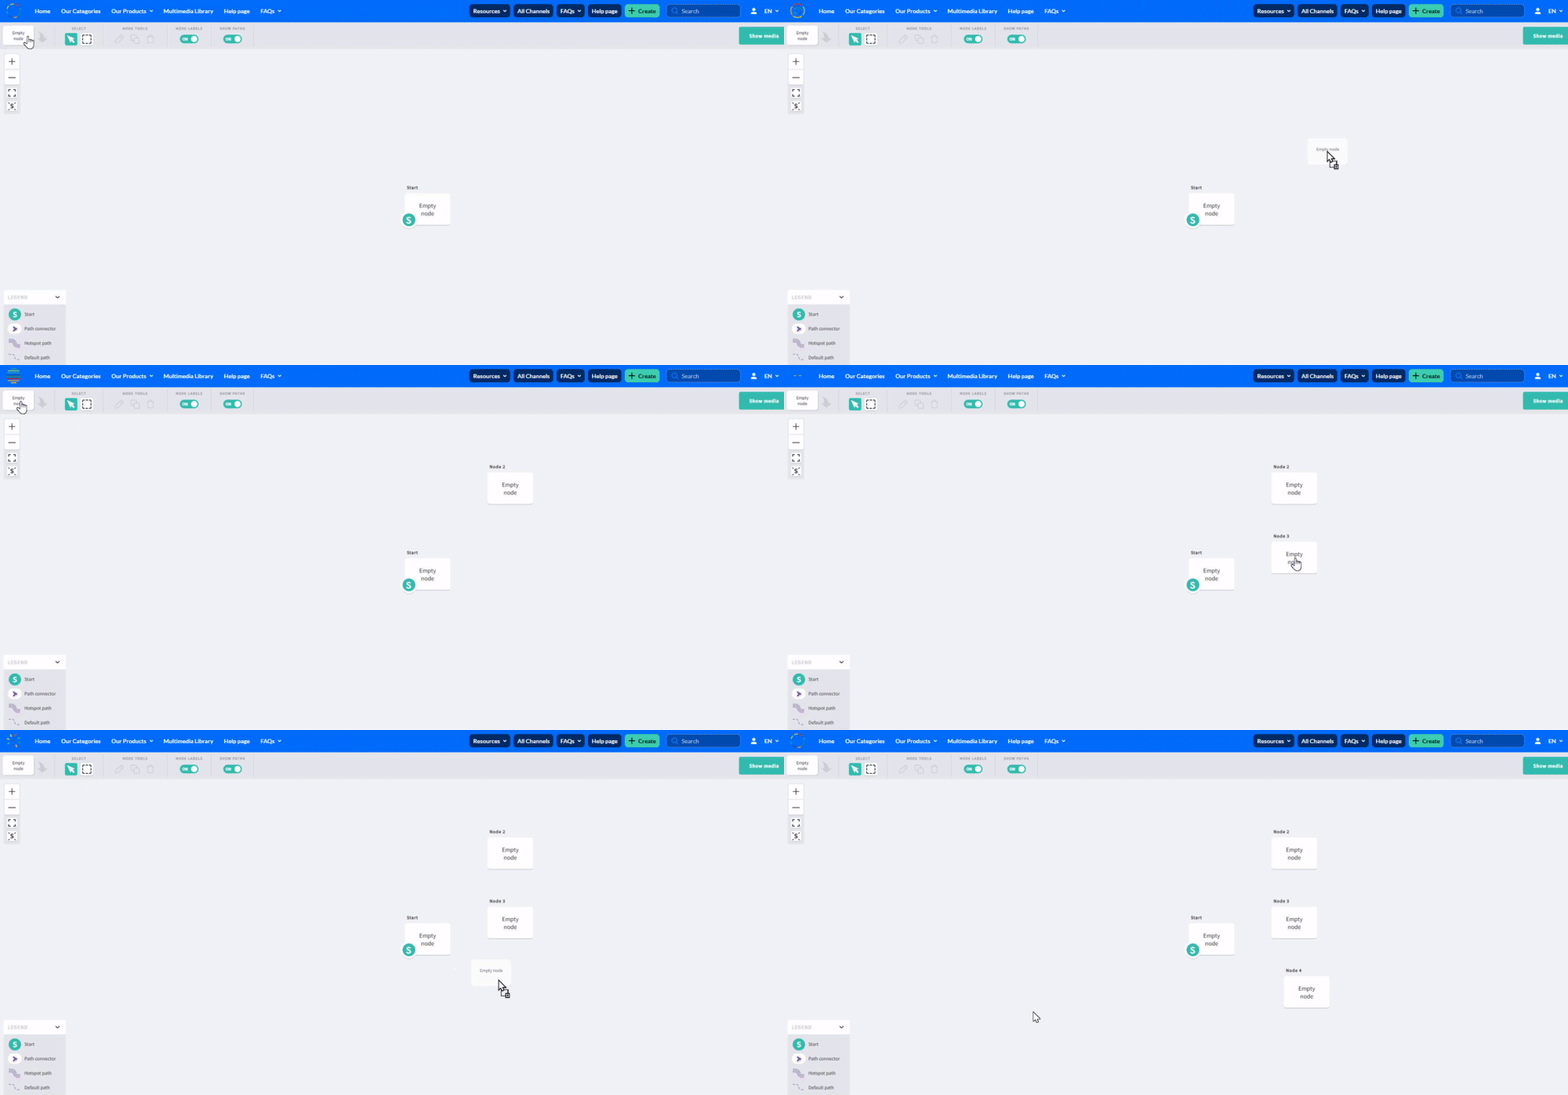
- To create the paths of your video, hover over the right side of a node and drag the arrow to another node.
You can connect a node to multiple nodes - even back to itself.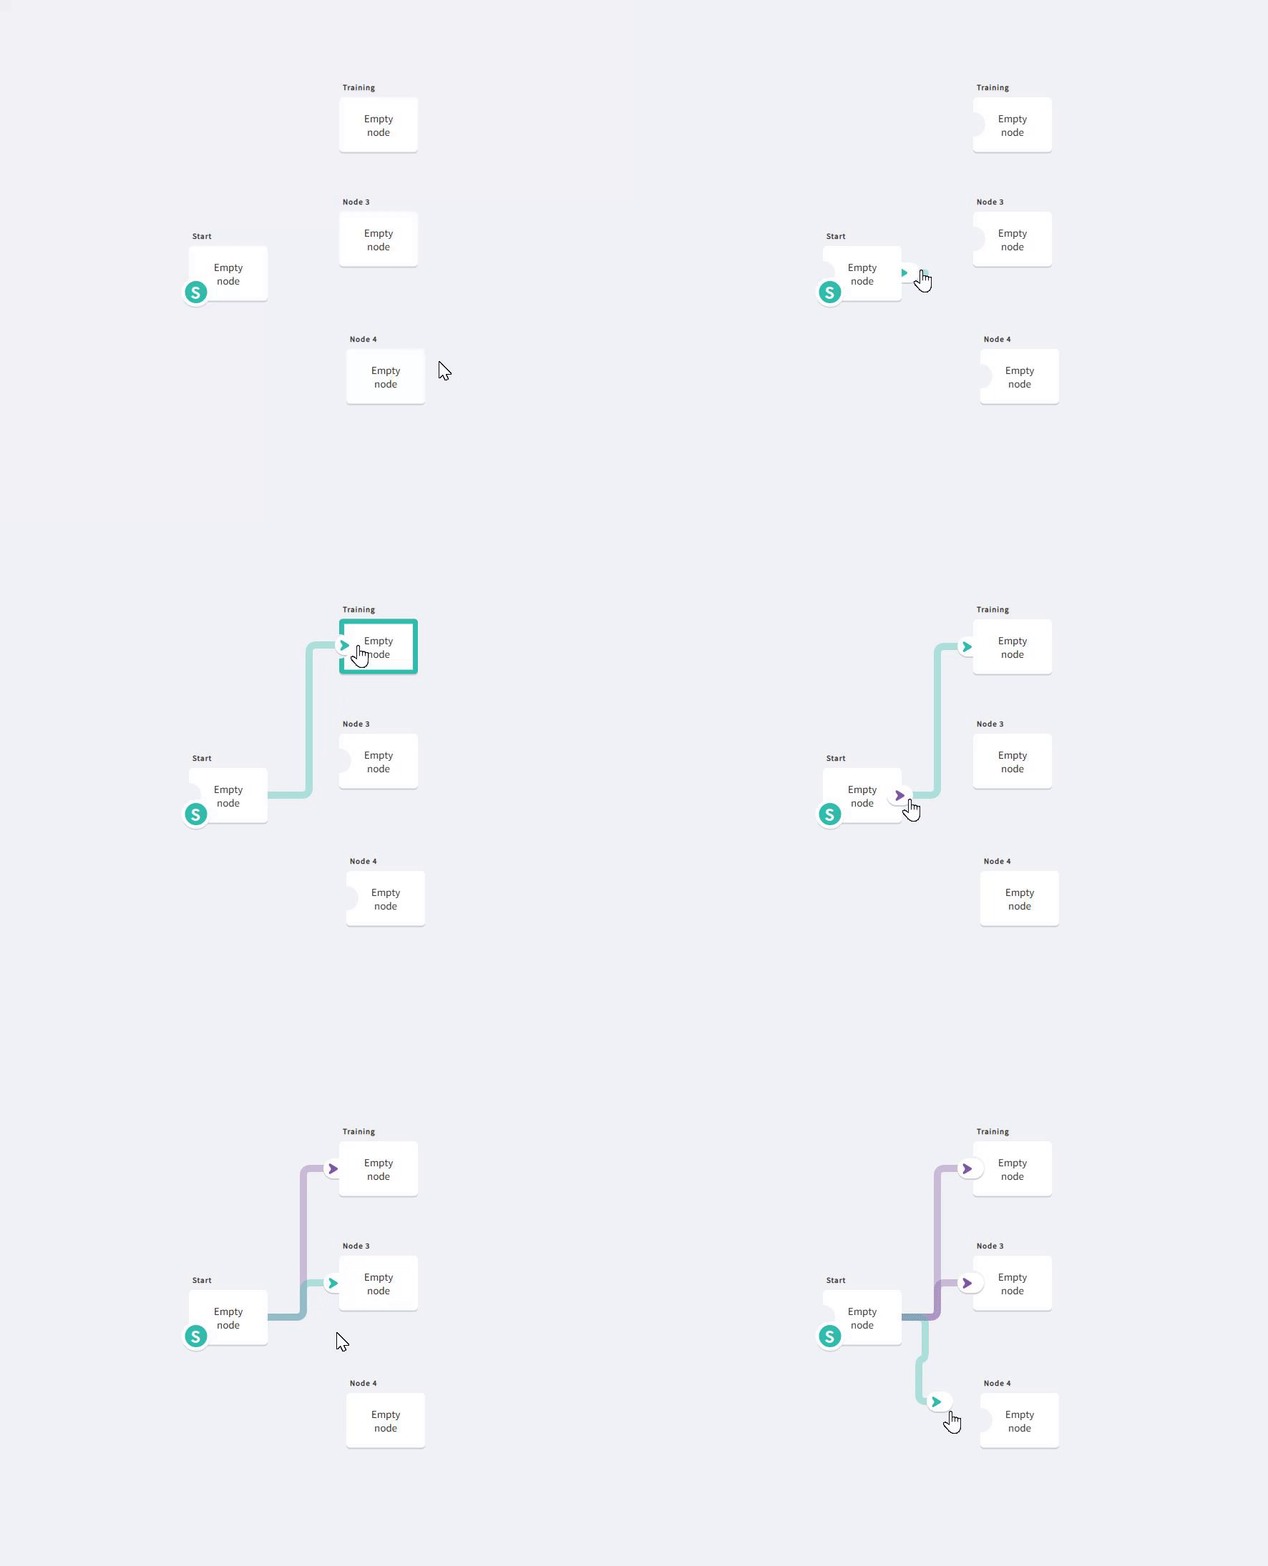
To delete a path, just click on the path (it turns green), then click the trash can icon at the top left to delete it.
-
To assign videos to nodes, click Show Media at the top right to open the media library.
- Drag the videos onto the desired nodes.
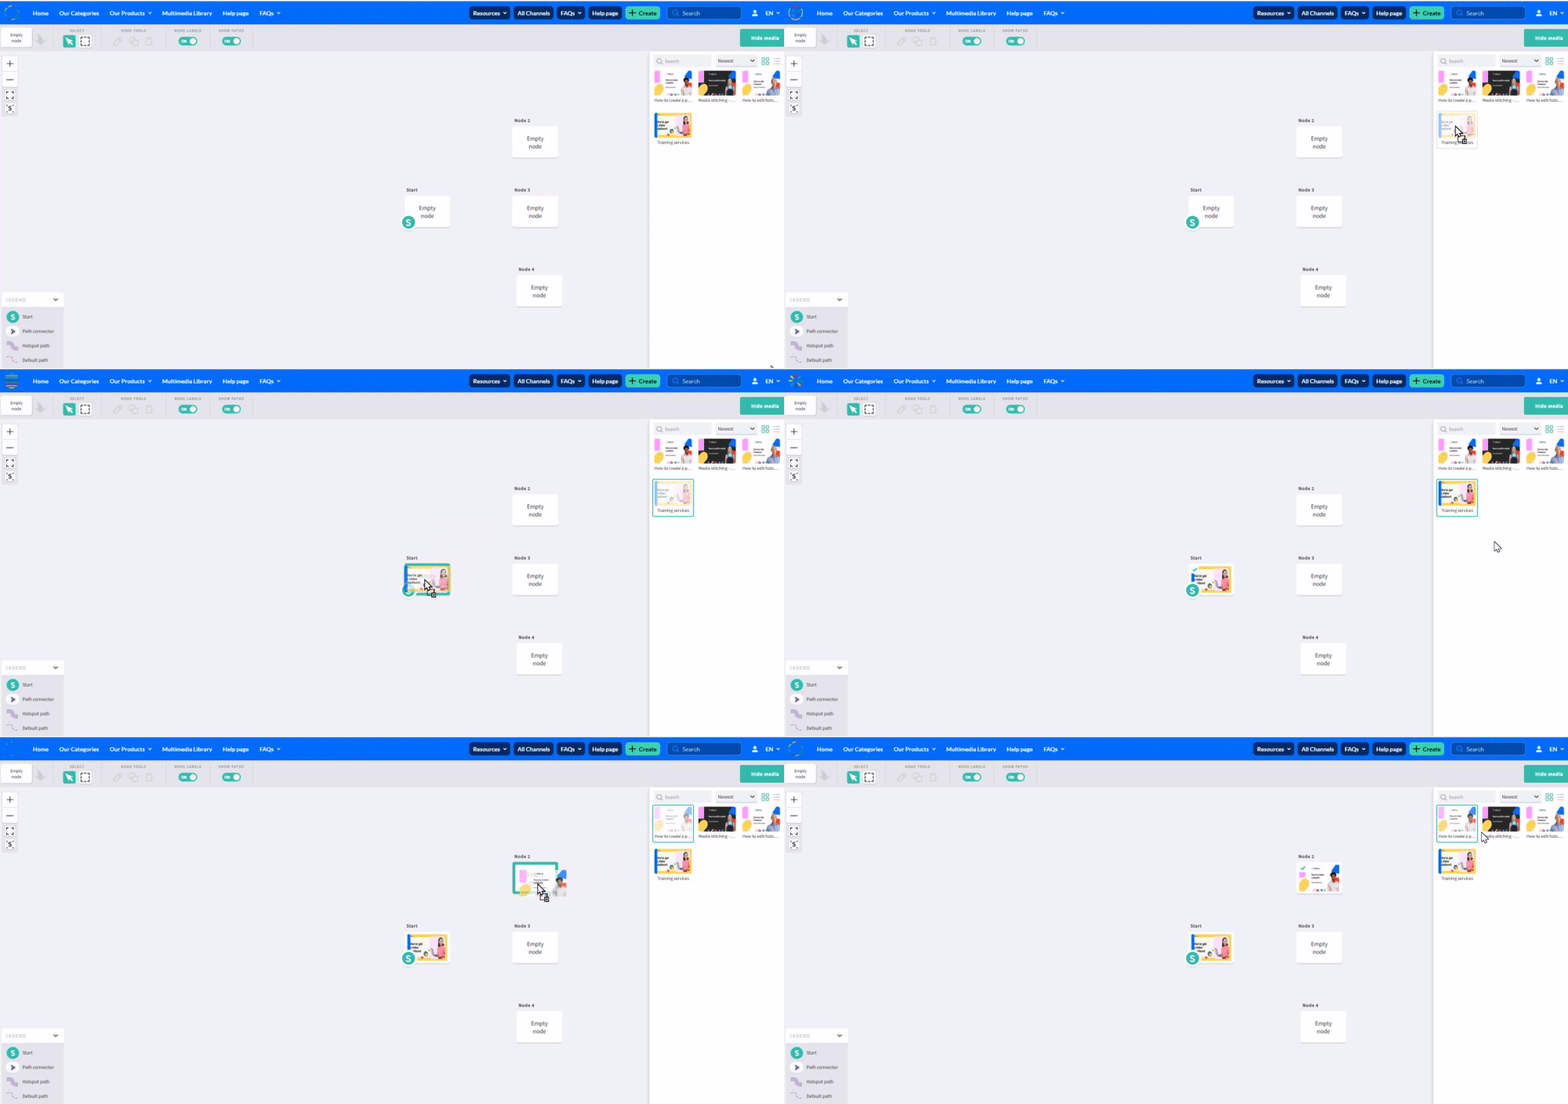
You can double click on the node name to rename it.
Create and edit hotspots (buttons)
When you connect nodes, the system automatically creates hotspots on the Start node. Hotspots are the main way to add interactivity to your video. They let users click areas in the video to jump to another video, open a web link, or trigger other actions.
There are two ways to create hotspots.
1. AUTOMATICALLY GENERATED HOTSPOTS
When you connect nodes, the system automatically creates hotspots on the Start node.
- Double-click the Start node to open the editor.
You'll see all connected hotspots stacked in the upper left corner. - Grab and drag them anywhere on the video to position them.
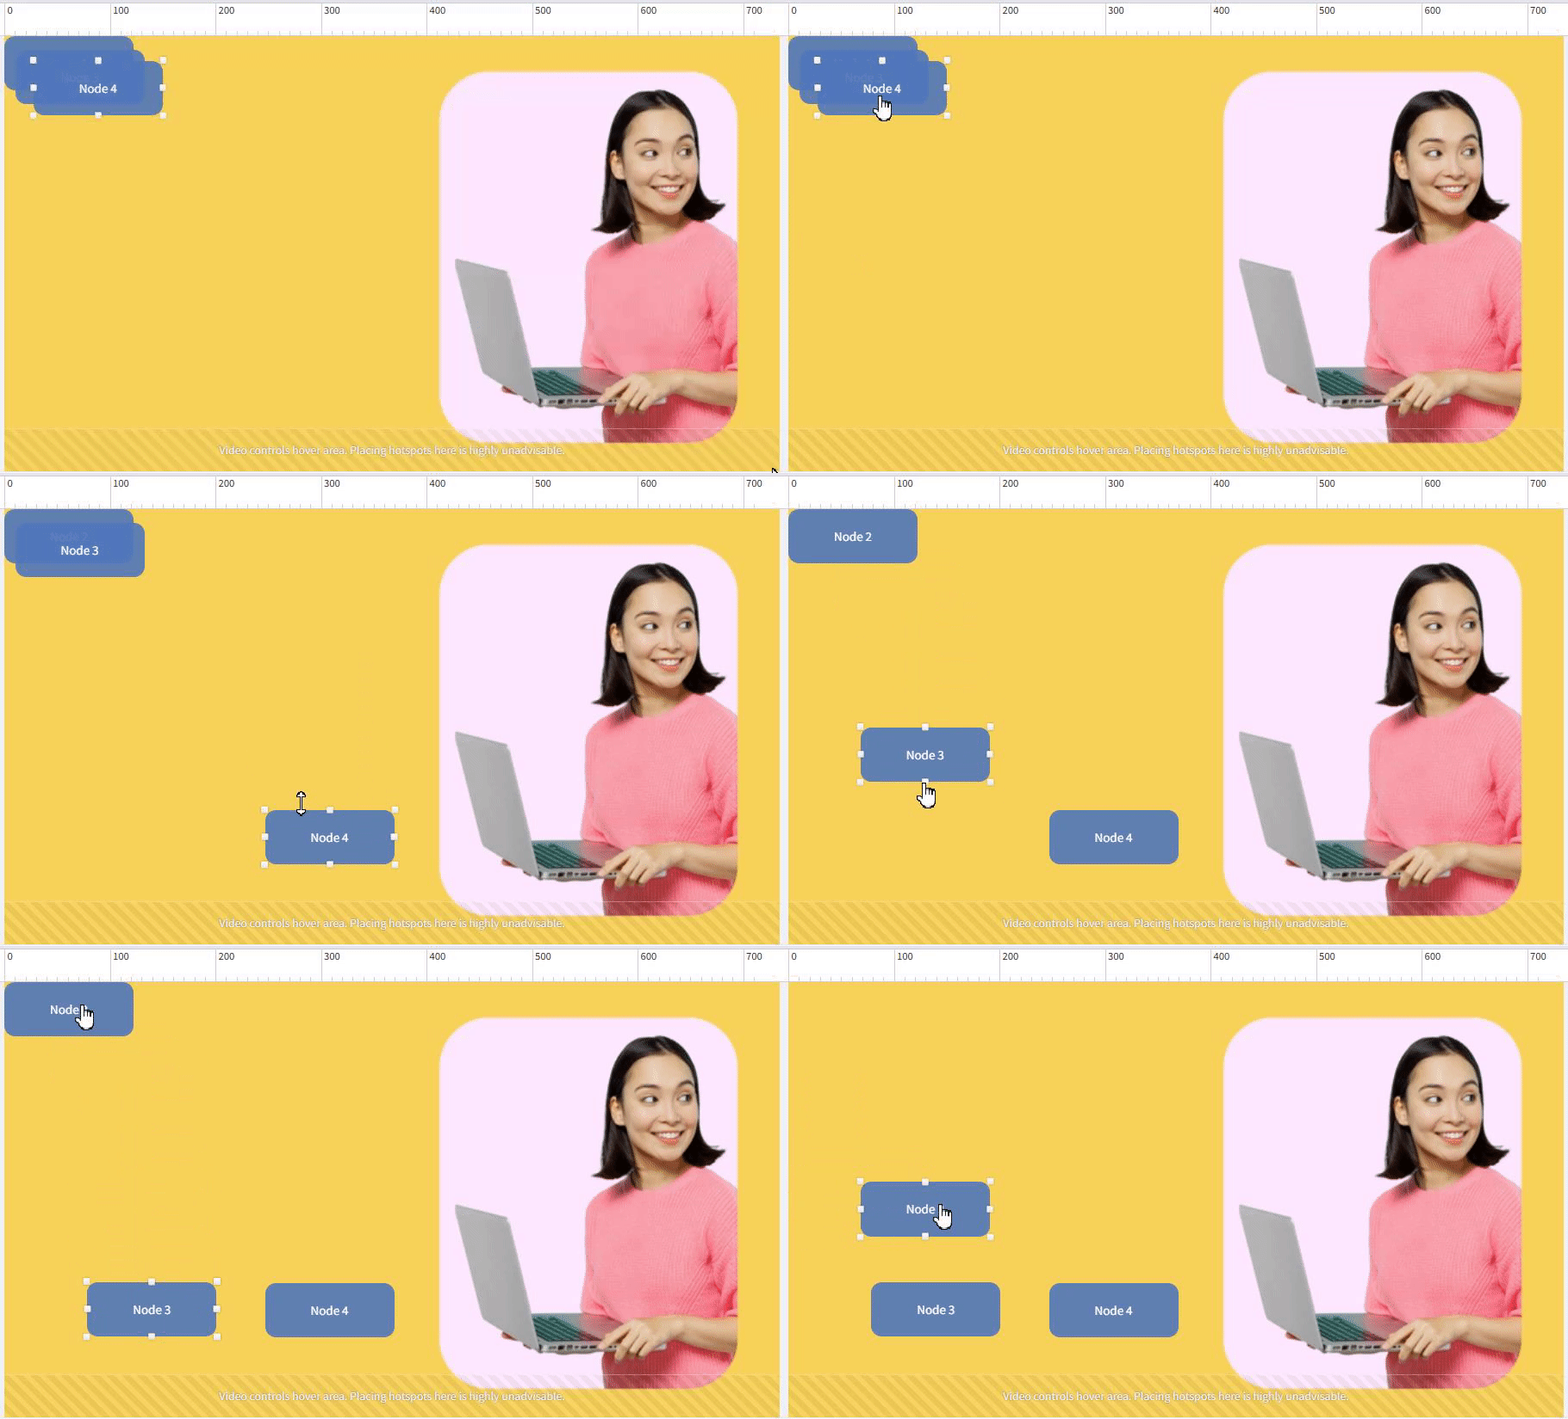
- You can edit these app-generated hotspots. See Edit hotspots below.
2. MANUALLY DRAWN HOTSPOTS
- Double click on a node on the node map to open the editor.
- Click on the Draw Hotspot icon to activate it.
- Draw the hotspot on your video.
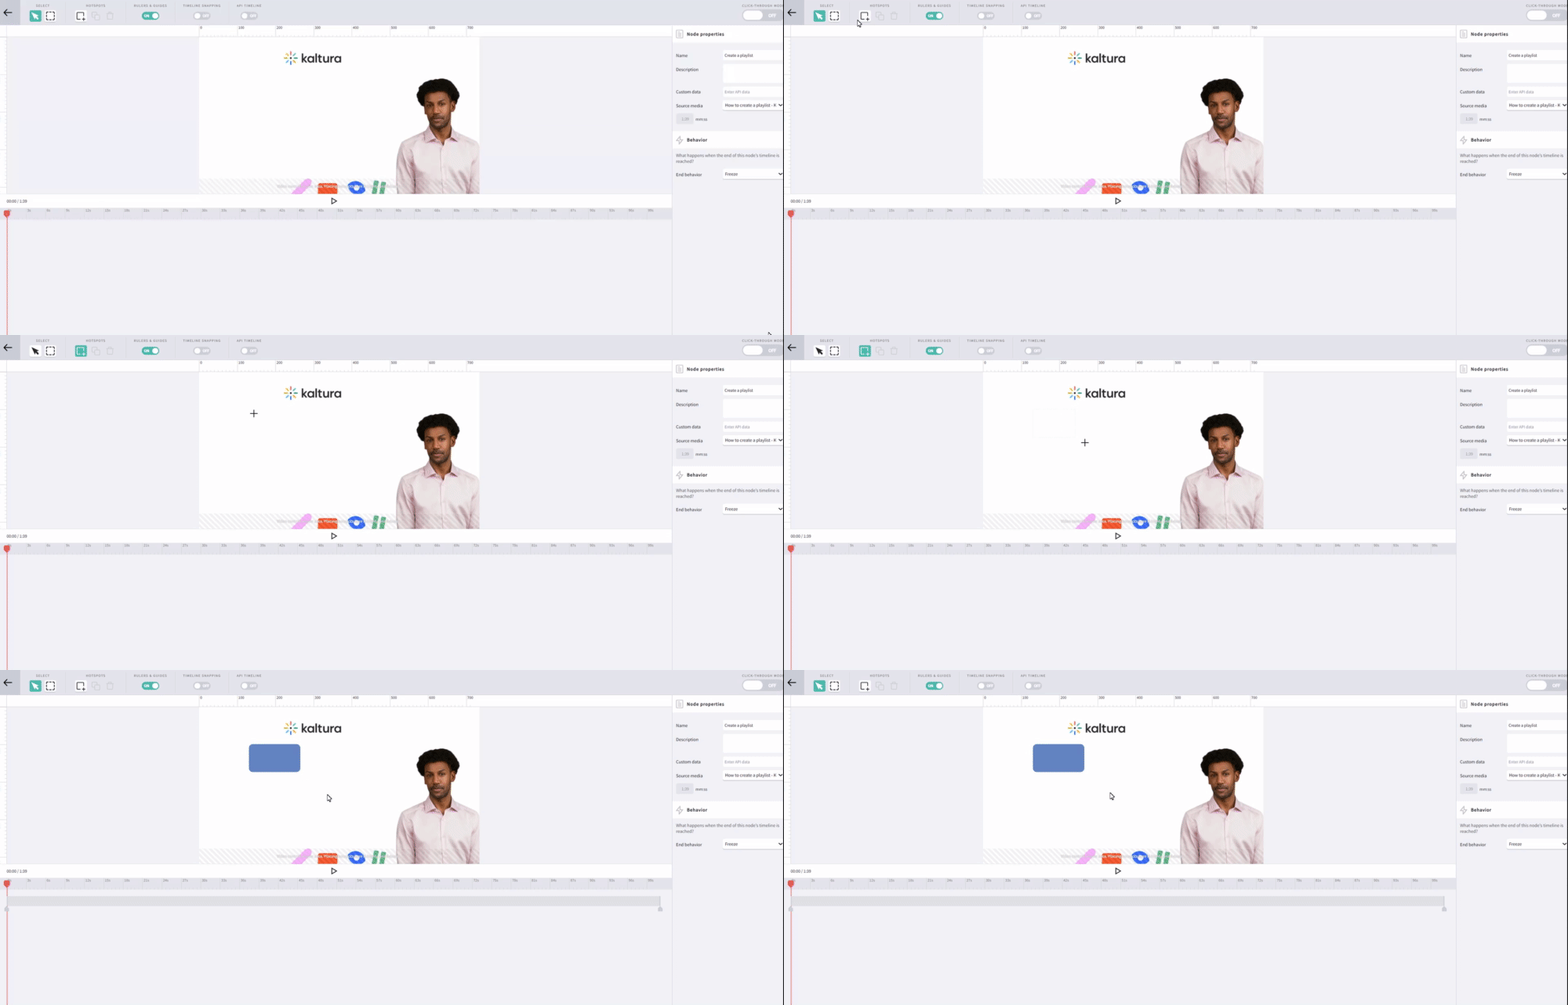
EDIT HOTSPOTS
- Double click on the hotspot to open the Properties panel on the right.
SIZE AND POSITIONING
- Drag the hotspot to reposition it.
- Drag the handles to resize.
- For pixel-precise control, use the properties panel on the right.
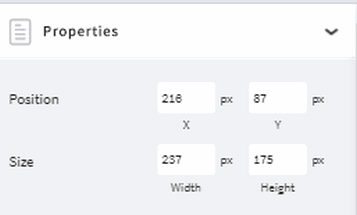
You can also add guides:
- Click the Rulers & Guides toggle at the top left.
- Click the ruler to add vertical/horizontal guides.
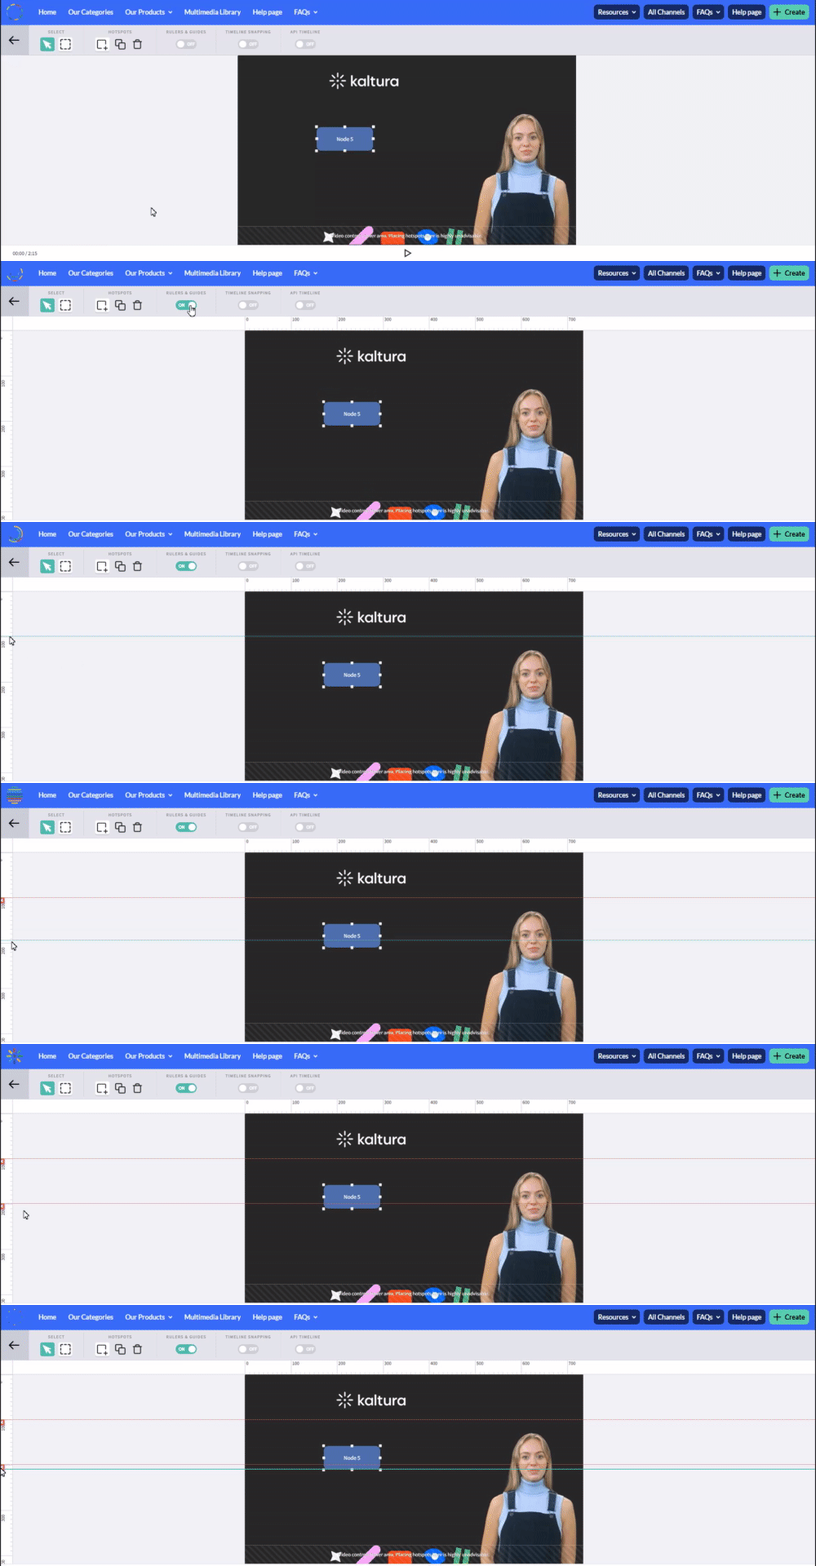
- Click the X next to a guide to remove it.
HOTSPOT BEHAVIOR
Options under the Behavior section of the properties pane answer the question “What happens when the hotspot is clicked?”
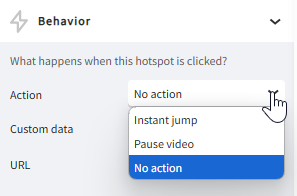
Under the Behavior section, choose what happens when the hotspot is clicked:
- Instant Jump: Instantly jump to another node.
- Pause Video: Pause the video (useful for Custom URL linkouts - see below).
- No Action: No click action; display text only.
For more detailed information about editing hotspots, visit the Kaltura Knowledge Center.
How do I create a video quiz?
A video quiz lets you add interactive questions directly into your videos to increase engagement and assess understanding.
By embedding questions directly into a video, Kaltura video quiz turns passive watching into active participation. You can:
- Check understanding as the video plays
- Identify which concepts may need review
- Measure the impact and effectiveness of your video content
You can also add quiz questions to YouTube entries uploaded through Kaltura. However, cue points, slides, and chapters aren’t available for YouTube-based quizzes.
Follow the instructions below to create your video quiz.
Launch Quiz editor
- Click the +Create button and select Video Quiz.
The Select media page displays. You can use the search field and filters to quickly find the media item you need.
- Click Select next to the item you want to use for your quiz.
You can click the eye icon to preview the media - press play to watch, then click Select or Close
If the Embed button is white, this means the mandatory metadata does not have a value. Please go to your media and complete all mandatory metadata.
If you want to upload a new media item for the quiz, click Upload at the far right. See Media Upload for instructions if needed.
Once you click Select, the quiz editor launches.
Configure quiz settings
1. DETAILS
Click the Details tab to edit the quiz details.
You'll see the following default values which you can change to suit your style or purpose (don't forget to scroll down while you're in the tab!).
- Quiz Name - This is the name you originally gave to the media item. You can change it to any name you want.
- Welcome Message - A default message is ready for you to use but you can change it to anything you like. The message is shown on the first screen of the quiz. If you don't want a Welcome message, Just untick Show Welcome Page.
- Allow Download of Questions List - This allows quiz participants to download the list of questions before starting the quiz.
- Instructions - The following default instructions will be displayed: "All questions must be answered. The quiz will be submitted at the end."
2. SCORES
Next, click the Scores tab to set or modify the scoring options. 
The following default values are displayed, and you have the option to change them:
- Allow Multiple Attempts - You can select how many attempts a participant has to take the quiz (the minimum is two per quiz). You then choose which score to keep (highest attempt, lowest, latest, first, or average of all attempts).
The number of attempts will be shown on the Welcome page as long as the Show Welcome Page has been enabled in the Details tab.
After a participant submits the quiz, the Submitted page shows the final score. (Participants won't be able to see their previous answers after they click Retake.)
The participant will also be able to see the scoring selection you chose:
- Do Not Show Scores - A 'Thank you' message will display after submitting the quiz, and no scores will be presented to the viewer.
- Show Scores - Participants will see the quiz score page after the quiz has been submitted.
- Include Answers - Participants will be able to see correct/incorrect answers, as well as the correct answer’s rationale if you chose to add it during the quiz creation.
If you change your mind, you can click Revert to defaults at any time.
3. EXPERIENCE
Click the Experience tab to set or modify the experience options.
The following default values are displayed, and you have the option to change them:
- Allow Answers Change - Allows your participants to change an answer before submitting the entire quiz during review mode.
- Allow Skip - This enables a "Skip for Now" button which allows your participants to skip a question and go back to it later.
- Do not Allow Skip - Participants must submit an answer before proceeding forward.
- No seeking forward - Participants won't be able to use the seek bar to navigate the video past the point they viewed.
You can choose Revert to defaults at any time.
Add questions to your video quiz
- While in the Quiz editor, navigate to the spot in the video where you would like to place a question.
- Click + Add a Question
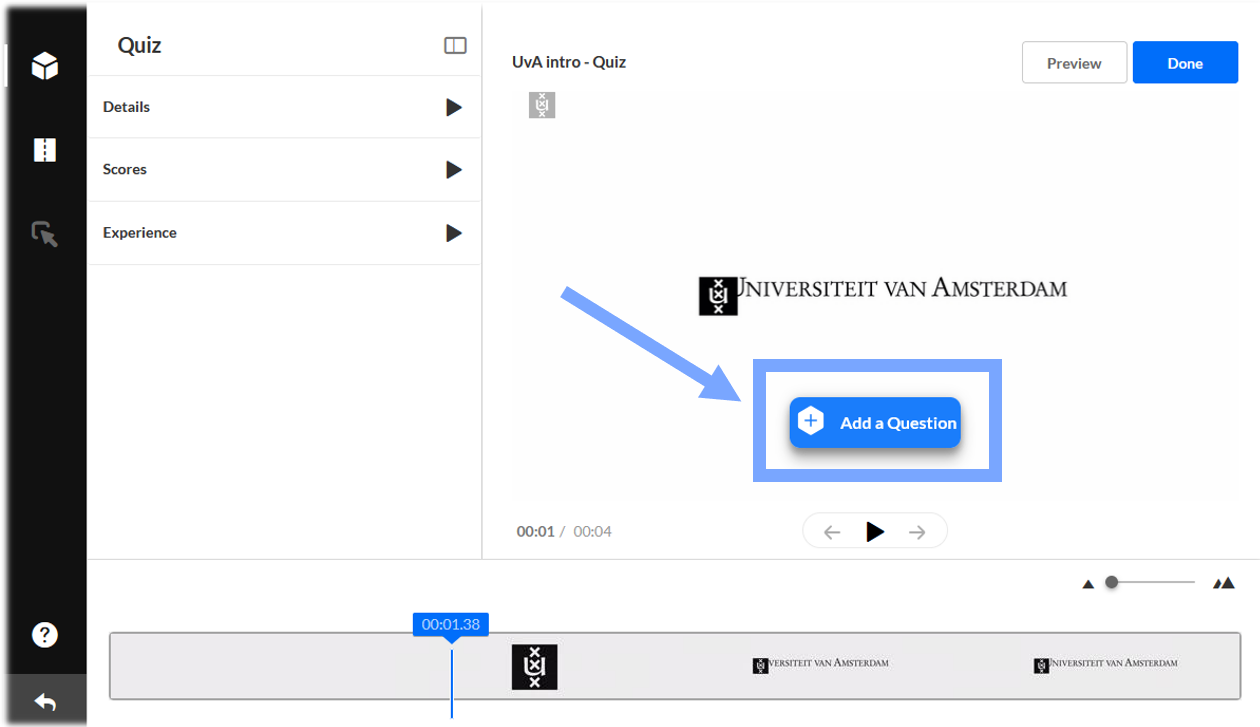
- Choose a question type:
- Multiple Choice - up to four answer options and only one correct answer.
- True/False - two answer options - True or False
- Reflection Point - displays a reflective prompt and pauses video playback.
- Open-Ended Question - participants type in their own words (400-character limit for questions, 250 for answers). Open-ended questions must be answered before submission and aren’t auto-graded. You’ll need to review and score them manually.
- Enter the question text in the Add a Question Here field.
- In the Add the CORRECT Answer Here field, enter the correct answer.
- In the Add Additional Answer Here field, enter other possible answers to choose from ( at least two answers are required).
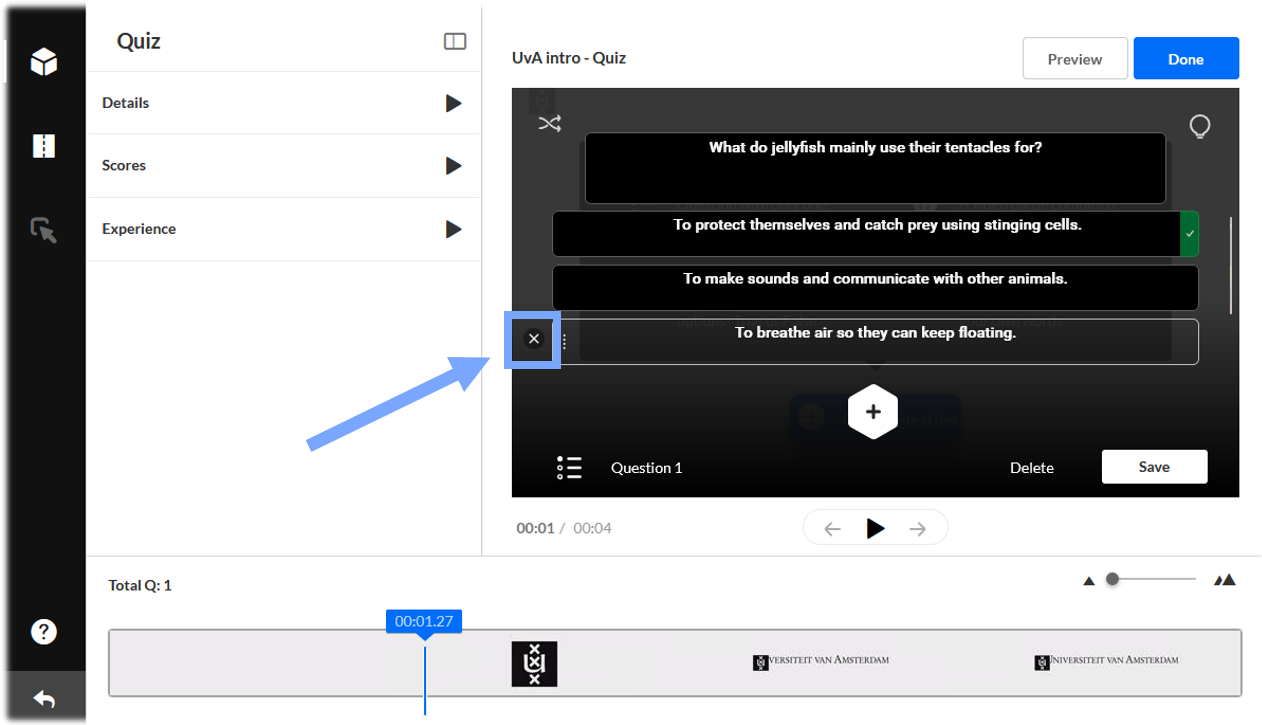
- Click the + icon to add more answers if you want.
- To delete an answer, hover and click the x that appears next to it. The correct answer can't be deleted, only modified.
- Click on the lamp icon if you want to add a hint or an explanation (Why) to your question.
The Why can give a justification for an answer (explain why it's the correct answer) .The Why comes up only at the end of the quiz and only when the option to Include answers is checked in the Scoring tab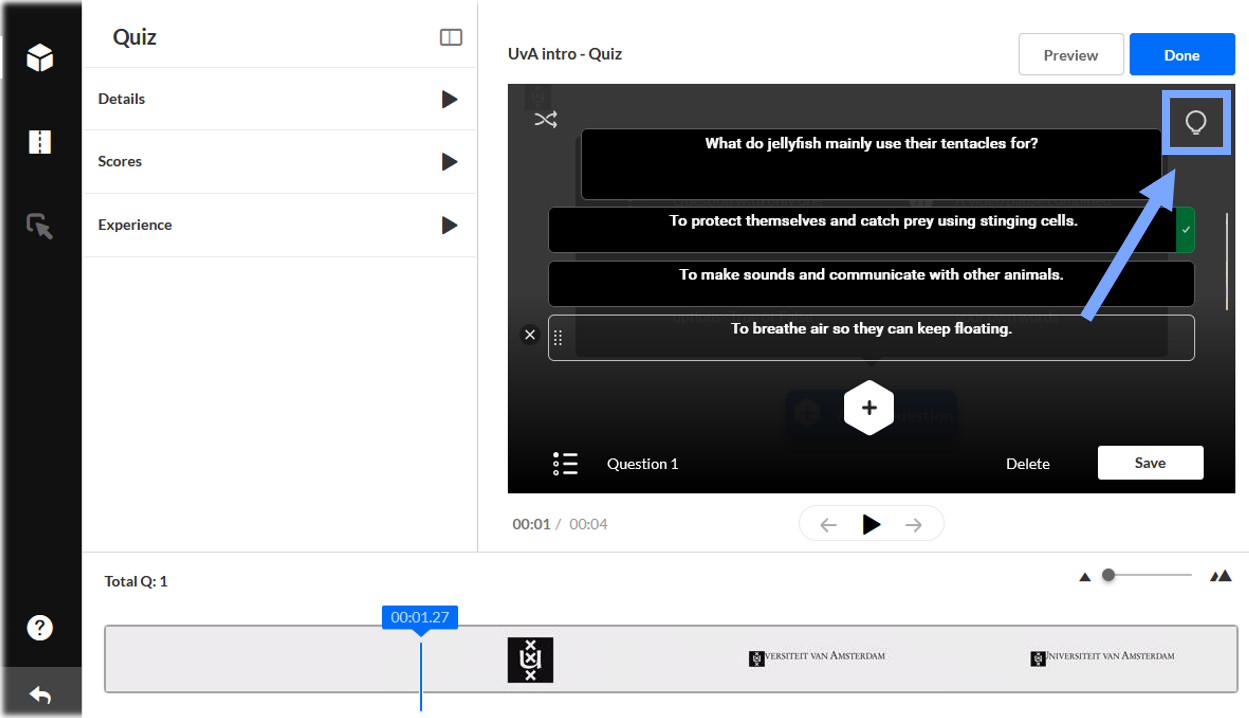

- After you have typed in the answer options, use the shuffle icon to shuffle the answers.
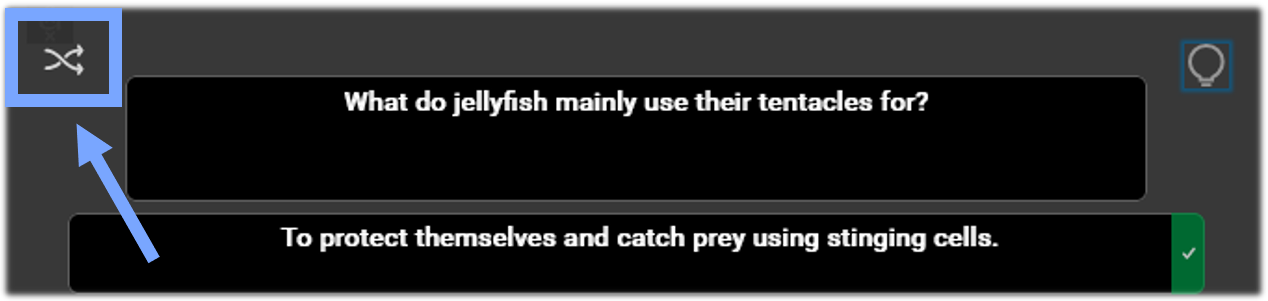
You can also shuffle manually by hovering over the dots next to the answers and dragging them to re-order them. The correct answer always has a checkmark in green at the end of it.
- Click Save to save the question or Delete. Your quiz saves automatically as you go.
The questions appear on the real-time marker, indicated by blue quiz icon.
- Hover over a question icon to preview it, or click to edit. Drag the icon to change its position on the timeline.
- For the next question you want to add, move the real-time marker to the point in the timeline where you want the question to appear. Avoid placing questions too close together as cue points may overlap.
- Repeat the steps for every question.
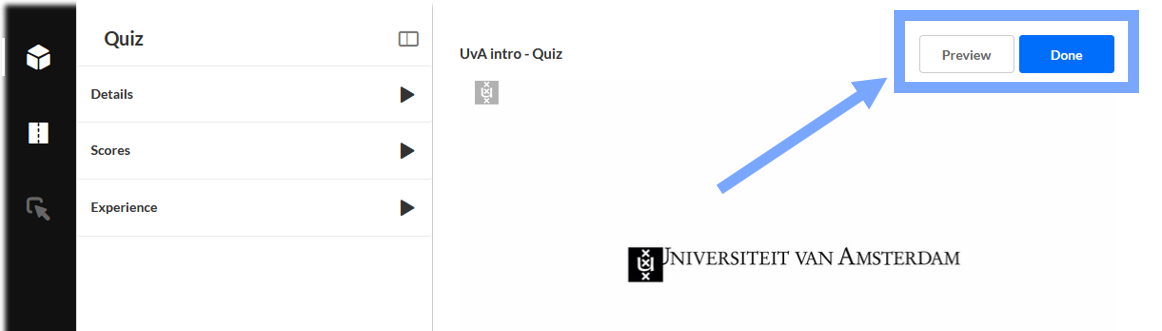
- When you have finished entering all the questions and answers, click Preview to preview your quiz or Done if you want to save your quiz.
ACCESSIBILITY
How do I switch to high contrast mode?
HIGH CONTRAST MODE AT VIDEO.UVA.NL
You can enable high-contrast mode on video.uva.nl by clicking the profile icon next to the search box.
HIGH CONTRAST MODE IN CANVAS
In Canvas, you can enable high-contrast mode by clicking the three dots next to the +Create button within My Media.
Why should I add transcriptions or subtitles to my media?
How do I generate transcriptions for my video?
- Go to My Media on video.uva.nl or in Canvas.
- Open the desired video.
- Click the three dots below the video, then select Captions & enrich.

- Set the Source media language to the preferred language.

- Click on Order.
A transcription of your media will be made with an accuracy of approximately 95%, depending on the audio quality and accent. After the subtitles have been delivered, the requester or co-editor can further refine them manually if needed or modify them into subtitles using the available editor. Once your transcription is generated, you can edit them or transform them into subtitles. For instructions see How do I edit generated transcriptions?
How do I edit generated transcriptions?
-
-
- Click on the Three dots menu button below the video, followed by Edit.
- Click on the Accessibility tab and locate your generated transcription file.
- Click the three dots and select Launch editor.
In this editor there are several components you can edit:
Edit detail
- In the editor, click Edit details to set the caption's language, accuracy and label.
The 'Edit caption details' window opens. - Update the caption's language, accuracy, and label.
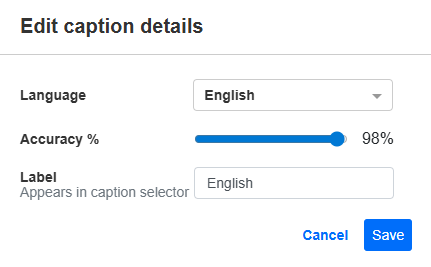
- Click Save.
Changes are applied immediately.
Find and replace text
- In the editor, click Replace.
- Enter the search term in the Find match field.
- Enter the replacement term in the Replace with field.
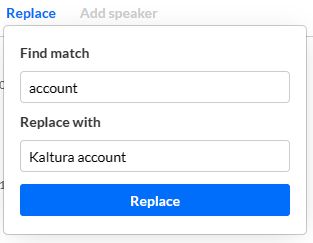
- Click Replace.
- Click Save.
Add speaker name
- In the editor, select the row(s) where you want to add the speakers, then click Add speaker.
- In the Speaker name field, type the name.
- Click Add Speaker.
The name is added to the selected captions.
- Click Save.
The information is immediately updated.
Edit a caption line
- Click a caption line.
- Update the text as needed.
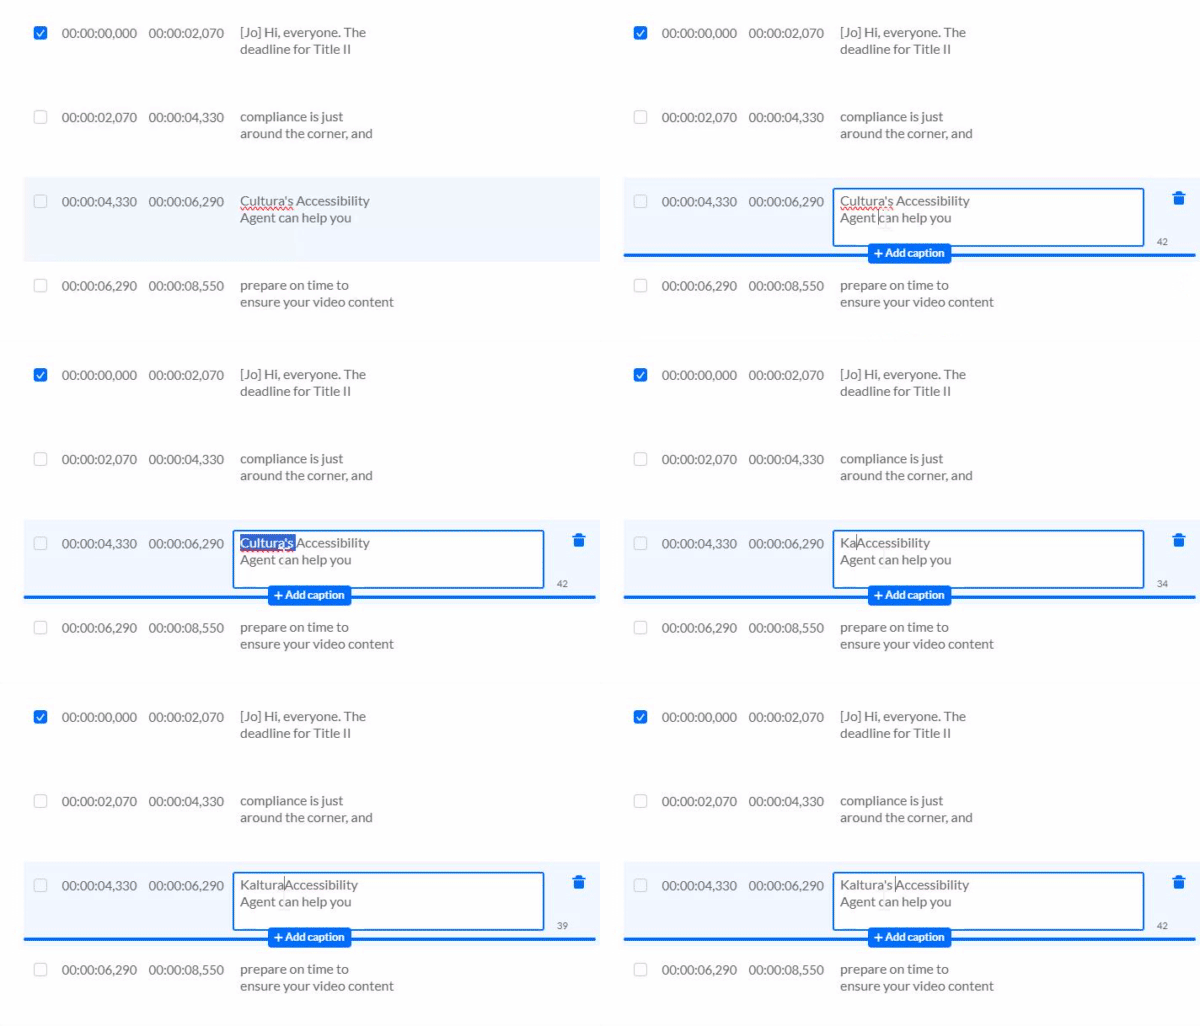
- Click Save.
The information is immediately updated.
Revert or save changes
- Revert restores the last saved version.
- Save applies your changes.
- Click on the Three dots menu button below the video, followed by Edit.
-
Why should I add an Extended Audio Description (EAD) to my media?
It is possible to add Extended Audio Description (EAD) to media. This feature makes videos more accessible for viewers with visual impairments. Extended Audio Description is an additional spoken narration that describes what is happening visually in a video, such as actions, facial expressions, or important elements within a scene. As a result, viewers who are partially sighted or blind can better follow and understand the content.
When a video contains an Extended Audio Description, viewers can easily activate it via the AD button in the video player.
Once enabled, the additional description will automatically play at the appropriate moments. Watch the video below to see an example:
How do I create an Extended Audio Description (EAD)?
An EAD file is created in VTT format (WebVTT). This is a simple text file in which you describe what is visually happening in the video, linked to specific timestamps. You can create this file using a standard text editor, such as Notepad (Windows) or TextEdit (Mac), and save it with the .vtt extension. See an example below:
WEBVTT

00:00:05.000 --> 00:00:09.000
Een vrouw gaat aan een tafel zitten en pakt een schrift.

00:00:12.000 --> 00:00:16.000
Ze opent het schrift. Een man komt binnenlopen.

00:00:20.000 --> 00:00:24.000
De man gaat naast de vrouw zitten.- To upload your VTT file, go to the desired media and click the three dots below the video, followed by Edit.
- Click on the Accessibility tab.
- Go to Captions & Extended Audio Description (EAD) and click Upload
- Choose Extended Audio Description (EAD).
The 'Upload Extended Audio Description (EAD) will load. - Upload your .vtt file by clicking Upload
- Give your EAD a label. This label will appear in the player when the viewer wants to select the EAD.
- Set your language.
- Define the accuracy.
- Click Add.